Interested in getting started with Node.js and TypeScript? Let’s jump right in.
Node.js
Node.js is “a JavaScript runtime built on Chrome’s V8 JavaScript engine.” Effectively, some clever developers have separated the part of Google Chrome that runs JavaScript and made it available for people to use outside of the web browser. Node.js is open-source, cross-platform, and used by many small and large groups. Beyond just web applications, it may be used to write console-style applications, services, simple utility scripts, and much more.
Node.js Installation
If you’re in a corporate environment, you may have Node.js packaged for easier distribution - so look into that first. If you’re free to install it on your own though, start by downloading either the latest long term service (LTS) or current release at the Node.js website if you’re on Windows or MacOS. If you’re on Linux, check your distribution’s prefered method for Node.js installation. For this post, I’ll be using the latest LTS release (currently v14.18.1).
Once you’ve run the download and install, fire up a terminal (or Windows PowerShell) and check which version of Node.js you have installed:
node --version
It should match what you elected to download. If it doesn’t and you’re on Windows, check your PATH environment variable to ensure the node executable path is in it (the MSI installer of Node.js installs to C:\Program Files\nodejs\, which needs to be either in your system or user PATH environment variable).
Hello World!
With the runtime installed, you’re ready to write your first program using it.
Tip
You’re going to need a text editor of some kind to write code. While Notepad.exe in Windows will work, I’d recommend using Visual Studio Code. It’s free and has some nice features for JavaScript development.
-
First thing’s first, we need a fresh directory to store our application.
mkdir nodejs-hello-world cd nodejs-hello-world -
Let’s create a file for our JavaScript:
Windows
ECHO "" > index.jsMac/Linux
touch index.js -
Next you’ll open the file in your editor of choice (I’m using Visual Studio Code here):
code index.jsTip
If you’re using Visual Studio Code, it’s actually better to open the directory. Try
code .instead! -
With
index.jsopen, let’s write some simple code inindex.js:console.log("Hello World!"); -
Back in your terminal, let’s go ahead and run the program. This is done by providing
nodethe location of the script.node index.js -
Celebrate! Really. You just installed Node.js and wrote your first application using JavaScript. 😄
package.json
With Hello World out of the way, it’s time to learn about the package.json file. What’s it for? What should you know about, and what are some cool things you can do with it?
The package.json file is the “manifest” of your application. It’s a simple JSON file that unlocks project configuration, usage of third-party dependencies, and additional developer productivity.
NPM Init
The easiest way to create one is to use the Node Package Manager (NPM) to initialize your project.
In your current project directory, run the following:
npm init
It’s going to ask you a few questions. At this point in time, the answers don’t matter. So you can hit the ENTER key until it’s done asking them.
Looking back in your project directory, you’ll find a newly created package.json file with not much in it:
{
    "name": "nodejs-hello-world",
    "version": "1.0.0",
    "description": "",
    "main": "index.js",
    "scripts": {
        "test": "echo \"Error: no test specified\" && exit 1"
    },
    "author": "",
    "license": "ISC"
}
Let’s review each of these properties and what they’re for.
- name - the name of your project. This doesn’t really matter unless you’re creating a reusable NPM package.
- version - the semantic version of your application. Again, this matters much more for NPM packages. So don’t sweat changing it for your own applications unless there’s something more complex (and interesting!) that your team is doing with it.
- description - another one for NPM packages. It’s a brief description of the app/package. Next.
- main - the entry point of your application. By default, it’s
index.js… which is what we need! If you ever change the location/name of yourindex.js, make sure and update this. - scripts - this is a configurable set of node scripts that you can run. It comes with the default
test, but we can (and will!) add some more. - author - the package author name. Another one good for NPM packages.
- license - indicates the license of the package.
Ouf of all of the above, the ones to watch at this point in learning are main and scripts.
Great you say. What good did this do me? Not much at this point. Consider this the foundation we’re going to build upon.
Tip
You can run the script defined in the main property by running:
node .
Scripts
We’ll start by changing the package.json to take advantage of the scripts capability. Remove the test script, and add a start script like the below:
{
    "name": "nodejs-hello-world",
    "version": "1.0.0",
    "description": "",
    "main": "index.js",
    "scripts": {
        "start": "node index.js"
    },
    "author": "",
    "license": "ISC"
}
Save the file, then run the below in your terminal:
npm start
If you’re successful, the output looks like this on Windows:
> [email protected] start C:\D\learning\nodejs-hello-world
> node index.js

Hello World!
Cool! What can we learn from this? The scripts configuration section can run arbitrary terminal commands on our behalf. In this way, you can write something useful, share it with those on your team, and they don’t have to know the exact commands to run to start or interact with your application. They can just look at the scripts section and run what seems most appropriate!
Dependencies
Node.js ships with the Node Package Manger (NPM). In fact, we just used to to run the start script above. NPM also allows us to install and manage Node packages. By default, dependencies are sourced from npmjs.com. In some corporate environments, this may be changed to look at an internal package management feed or just an alternate to npmjs. This allows groups to build and maintain their own reusable code, distributed using private NPM packages.
Warning
While most Node packages are non-malicious, you should always do your due diligence before using (or executing!) anyone else’s code on your machine.
Local or Global
When installing NPM packages, they can be installed either locally or globally. Local packages are available only to the application within the same directory as where they are installed. Global packages can be used by any Node.js package on the same machine, as well as from the terminal (if that package supports it). Unless you’re trying to achieve something specific, always default to installing your packages locally.
Direct Dependencies
Let’s install an NPM package and use it within our application. It’s time our Hello World app had some color! For this, we’ll be making use of the colors NPM package. Take a quick look at how the color module may be used.
npm install colors
Once complete, take a look at the package.json file. It now lists colors inside of the dependencies section. This section is used to list the direct dependencies of your application. You should use it for any dependency directly called by your application code. There are other types of dependencies, and we’ll touch on at least one more of those before the end of the post.
Now let’s make use of it!
-
In your editor, open the
index.jsfile. -
On line 1, require the
colorsmodule.require("colors"); -
Update your Hello World line to colorize it. Note that there are lots of available colors!
console.log("Hello World!".rainbow); -
When you’re done, here’s what
index.jsshould look like:require("colors"); console.log("Hello World!".rainbow); -
Save the file, jump back to your terminal, and run the application.

Fancy!
What did we just do?
- We used the
requirekeyword to inform Node.js that it should import thecolorsmodule. - We used the
.rainbowextension that thecolorsmodule added to all strings.
Is there more we can do? No doubt!
Dependency CLI Usage
Many dependencies expose a CLI, or command line interface. The colors package does as well. Maybe we like colors in our app, but others don’t? Simple. Let’s add a script that disables them, taking advantage of the colors package capability to do so.
-
Add a
start:no-colorsscript topackage.json(just the script section shown below, leave the rest alone):"scripts": { "start": "node index.js", "start:no-colors": "node index.js --no-color" } -
Save the file, then try it out back in your terminal:
npm run start:no-colors > [email protected] start:no-colors C:\D\learning\nodejs-hello-world > node index.js --no-color Hello World!
What did we just do?
- We added a new
scriptto ourpackage.jsonwhich makes use of the documented CLI capabilities of thecolorspackage. - We ran that script using
npm run <script-name>.
But wait! What’s this npm run thing? We made use of npm start before to run a script, but that was a special case that the start script and only a few others can use. Most of the time, you’ll need to use npm run before your script name.
Tip
npm start, npm stop, npm restart, npm test, and npm run-script will all run their corresponding script without having to make use of npm run <script-name> syntax.
TypeScript
TypeScript is JavaScript with syntax for types. TypeScript code gets converted to plain JavaScript before running in the web browser, or with the Node.js runtime. Most commonly, developers use it to get better editor integration and safety, as many common errors are caught during the JavaScript conversion process.
TypeScript Installation
We can leverage NPM to install TypeScript. We’ll tweak how we perform the install to designate TypeScript as a development dependency as it is not directly used at runtime, only during our development of the application. Typically this will contain packages related to unit testing, packaging, document generation, etc.
npm install typescript --save-dev
Take a look at package.json and notice how typescript is referenced.
{
"name": "nodejs-hello-world",
"version": "1.0.0",
"description": "",
"main": "index.js",
"scripts": {
"start": "node index.js",
"start:no-colors": "node index.js --no-color"
},
"author": "",
"license": "ISC",
"dependencies": {
"colors": "^1.4.0"
},
"devDependencies": {
"typescript": "^4.4.4"
}
}
Next, we need to setup the current directory as a TypeScript project. We’ll use the npx command, which allows us to call packages with CLI exposure that aren’t installed globally (like TypeScript, in our case).
npx tsc --init
This creates a tsconfig.json file in our project directory. It’s pretty big, so I won’t copy it here. But know that it sets some reasonable defaults for TypeScript transpilation. Depending upon your team and project needs, expect to see variations of the configuration.
Next, let’s setup a new script in package.json to build our application:
{
"scripts": {
"build": "tsc"
}
}
Finally, rename the index.js to index.ts. All TypeScript files end in .ts (or .tsx for files containing JSX syntax).
TypeScript Transpilation
When we write TypeScript, we must transpile it into JavaScript before it can be used in web browsers or by the Node.js runtime. The TypeScript CLI (tsc) will perform this transpilation for us, respecting the configuration in tsconfig.json. Let’s give it a shot.
npm run build
Well… that didn’t go well, did it?
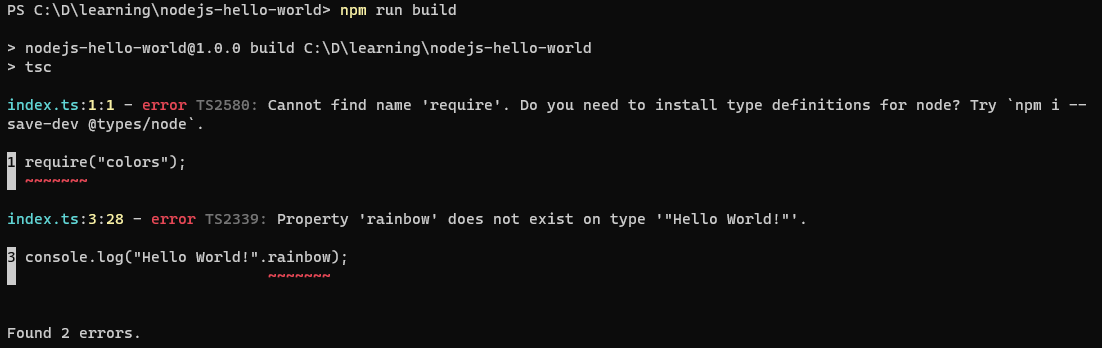
Let’s work through the errors and learn from them.
First error - it cannot find ‘require’? I thought that was valid? Yes and no. It’s valid JavaScript, but TypeScript is complaining because it can’t find types for Node and it’s even giving us guidance on what to do. Great! Copy+paste:
npm i --save-dev @types/node
What’s that doing anyway? Well, npm i is the short syntax for npm install. --save-dev is an option, and while we normally put it last it can be in any position after the i or install. Lastly, @types/node is an NPM package that will inform TypeScript about the types present in the Node.js runtime.
Second error - “Property ‘rainbow’ does not exist on type ‘“Hello World!”’. Another error having to do with types… My bet is that we need types for the colors module. Many NPM packages come with their own types. Some don’t. First thing we should do is check and see if this package actually has types information.
- In the project directory, find and expand the
node_modulesdirectory. This is where NPM stores all of the packages we’ve set as dependencies (and all of those depedencies’ depedencies and so on). - Find the
colorsdirectory and expand. - Look for a file ending with
.d.ts. This will contain types information so that TypeScript (and our editor) can make good decisions.
Wow. It does have a types file. What’s wrong then?
Let’s look back at our code:
require("colors");

console.log("Hello World!".rainbow);
While TypesScript can make use of the require method from Node.js, it much prefers for us to import packages instead. Let’s swap that out.
import "colors";

console.log("Hello World!".rainbow);
If you’re using Visual Studio Code, all of the red squiggly lines just went away, so you know you’re good. Let’s run our build now!
npm run build
No errors! Let’s take a look at our project directory. Hey! Our index.js file is back! TypeScript transpiled it from our index.ts. Reviewing the contents, it’s not all that different from our previous index.js before we made all the changes for TypeScript. But does it still work?
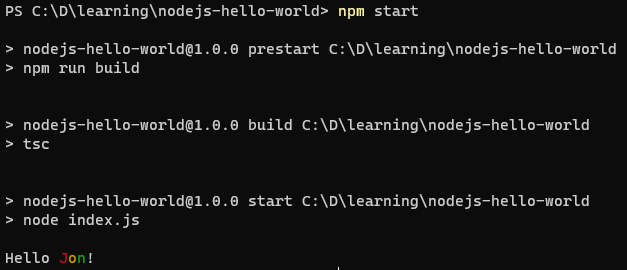
npm start
Sure does. Let’s make one last change to package.json to run our build before our start. We’re going to take advantage of some nice convention to run multiple scripts in a sequence. You can prefix any script name with pre and it will execute before that script. Here’s our updated package.json scripts block:
"scripts": {
    "build": "tsc",
    "prestart": "npm run build",
    "start": "node index.js",
    "start:no-colors": "node index.js --no-color"
  },
Running npm start, you’ll now see that our build script runs first. Nice.
Fun with TypeScript
Now that we can perform Hello World with Node.js and TypeScript, let’s explore a couple more basics to get us started.
Refactoring Round 1
Right now, all of our code is in index.ts. As index.ts is just meant to be the entry point of the application, we ought to keep it very high level and put our detailed logic in other files. In this way, the index.ts serves it’s single purpose, and the hello.ts serves it’s single purpose (see Separation of Concerns and Single Responsibility Principle if you’re interested in why this is a good idea in your applications). Time to refactor! 😄
-
In your directory, create a
hello.tsfile alongsideindex.ts. -
Move all of the code dealing with saying Hello World into
hello.ts. -
Now, let’s wrap our
console.logline in a function, substitute outWorldfor someone’s name, and export that function:import "colors"; export function hello(name: string) { console.log(`Hello ${name.rainbow}!`); }What did we just do?
- The
exportdirective exposes ourhellofunction to other files who may want to call it. Without it, thehellofunction wouldn’t be visible. - We provided the
stringtype on thenamefunction parameter. This allows the IDE and the TypeScript transpiler to error out if you try to call thehellofunction with a number, Date, or anything that’s not a string. - We made use of template literals (also sometimes referred to as string interpolation or template strings) to make our function include someone’s name in the output.
- I tweaked the logic a bit to colorize the name, but leave “Hello” alone. Might look neat!
- The
-
We’re not done yet. Save the file, the switch back to
index.ts. -
We need to import our new
hellomodule, and call the exportedhellofunction:import { hello } from "./hello"; hello("Jon");What did we just do?
- We imported the named export
hellofrom the./hellofile. The name of the file and the method being the same is just a coincidence. You can export whatever you want from your TypeScript files - functions, constants, classes, etc. - We called the
hellofunction and gave it a value.
Did it work? Yep.
- We imported the named export
Organize the Project and Transpile to a Single File
Right now, we have too many files in the root of the directory. Let’s follow JavaScript project convention and place all of our source code into a src directory. Here’s what should be left in the root when you’re done:
node_modules
src
package-lock.json
package.json
tsconfig.json
Note - if you build now, it will be broken. Let’s finish out the next few steps.
Now that we have multiple files of source code, the TSC utility produces a .js file for every .ts. This is fine for some cases, but if you want to let users download your script in a webpage you probably want one file. For larger applications and more complex scenarios, bundlers are typically used (like WebPack or Vite). However, there’s also a very simple NPM package named @vercel/ncc which we can use if we just want a single file output.
-
Install @vercel/ncc, saving it as a development dependency:
npm install @vercel/ncc --save-dev -
Update the
buildscript:"build": "ncc build ./src/index.ts -o ./dist" -
Since the above command moved our application entry point (which needs to be JavaScript) into the
./distsubdirectory, let’s also update themainproperty of thepackage.json:"main": "dist/index.js" -
We’ll also switch over how we’re starting the application to use the shorter method (
node .). Here’s the finalpackage.json:{ "name": "nodejs-hello-world", "version": "1.0.0", "description": "", "main": "dist/index.js", "scripts": { "build": "ncc build ./src/index.ts -o ./dist", "prestart": "npm run build", "start": "node .", "start:no-colors": "node . --no-color" }, "author": "", "license": "ISC", "dependencies": { "colors": "^1.4.0" }, "devDependencies": { "@types/node": "^16.11.6", "@vercel/ncc": "^0.31.1", "typescript": "^4.4.4" } }
We can test the app using npm start and see that it’s transpiling and producing a single file, located in the dist directory, then running that with the Node.js runtime. While this doesn’t seem all that useful to us now, for many developers new to using TypeScript, this is a very easy path to producing the single file they need to use in their existing web applications without a lot of fuss or configuration.
Wrapping Up
I think this is enough for one blog post. Depending upon your interests and/or role, here are some good next steps:
- Aspiring Single Page App developer? Pick a framework (e.g. React, Vue, or Angular are three of the most popular right now - if you read this post in a year that list will probably change). Read their docs and try them out, then decide on a bundler (e.g. WebPack or Vite are both great, but there are others) in the same way - read, try, implement.
- QA Engineer or SDET? Use your newfound Node.js and TypeScript skills to drive Selenium or Cypress.js for End to End web testing; Appium for mobile app testing; or write all of your API tests with Jest and Axios. The sky is the limit to what you can automate and make testable.
- Backend developer? Become a fullstack dev by following the SPA dev path above. It’s great for the resume 😄
- Any IT role - Leverage the rich NPM package ecosystem to automate repetitive tasks as you work with files and websites on a day to day basis. While PowerShell or Bash are probably the first things you should learn on this path, Node.js’s available packages can achieve quite a bit with just some reading and light integration work.